Pages - Menu

Thursday, August 1, 2013

Sunday, July 28, 2013

The Beauty Review: Miracle Skin Transformer


Every time there is a Sephora nearby, it is almost like Sephora is a powerful magnet and I am a puny metal that gets dragged from meters away. I go in, try on a lip product, and then go to the makeup counter to see what samples they have available. 

During my recent trip to this makeup heaven, there was a representative from Sarah McNamara was at the counter, and she introduced to me the brand's Miracle Skin Transformer. She described it as a "unique" BB cream that does five things in one product, like every other BB cream out there. She insisted that I take a couple of samples home to try out on my own time. Little did she know, I love getting free samples so I was beyond happy to take those babies home. 

After testing it out of myself and wearing it out for a day (a very hot day, in fact), I thought I would whack on a short review for you all!


What It Says It Does
The packaging of the Miracle Skin Transformer says that it hydrates, primes, enhances, mattifies, and protects all in one single step. It has an SPF of 20 and is also full of antioxidants which we all know helps to prevent wrinkles from popping up on our faces. According to Sephora.com, this product is formulated to improve your skin tone, luminosity, and texture, while minimizing the look of pores, fine lines, and imperfections.

What It's Really Like
The Miracle Skin Transformer is unlike most other BB creams in terms of texture. It is more like a mousse than anything else. It provides a light to medium coverage. It has good lasting power after I wore it out in the California sun for a few hours without a primer. You definitely DO NOT need to finish this product off with a dust of powder. I initially found it interested that it claims to both hydrate AND mattify your skin. After using it, I would say that it does a great job of mattifying your skin and not so good of a job at hydrating it. If you have dry skin, do not use this BB cream because it will make your skin seem even more dry. It may be more fitting if you have really oily skin. What is the best way of applying this product? You can either use your fingers or a brush, but you have to work it into your skin quickly because it sets fairly quickly.   


My Final Verdict
It is a decent product, but I personally would not purchase it. I prefer my foundations/BB creams with a slightly dewy finish so I can have the option to go over it with a powder if I feel like it. If you have oily skin, try it out and see if you like it. The Miracle Skin Transformer, in my opinion, would be good for people in school who want a product that has a light coverage and does not need any powder. 


I hope you found this review helpful!!

Lisa xx

Saturday, July 20, 2013

Chocolate Bonanza Cookies


History has been made.

I have created something so amazing that it might as well be adapted into your local high school's history books. 

Using Pioneer Woman's recipe for Chocolate Chocolate White Chocolate Chip Cookies, I made the ultimate chocolate cookies. There is so much chocolate packed into these cookies that I personally call them Monthly Gift Cookies because when Mother Nature brings a woman her monthly gift, these are the cookies she will want to be munching on. Trust me, I know. You can honestly call these cookies anything and it would work: Life of the Party Cookies, Oh My Cookies, Please Your Man Cookies, Kryptonite Cookies, etc. The only that would make these cookies even better is if you could lose weight by just eating them. If only....

Click here to be taken to Pioneer Woman's recipe for her chocolate cookies.


I made a couple of adjustments to her cookies to add a personal touch. 


Firstly, instead of two cups of granulated sugar, I used 1.5 cups. I then added half a cup of brown sugar because I like my cookies to make that sort of hint of molasses taste to them.


Secondly, I dumped in a whole bunch of different types of chocolate. In addition to the traditional semisweet chocolate chips, I added Swiss milk chocolate squares that I picked up from Canada, French white chocolate squares from my trip to Epcot, and, my personal favorite, milk chocolate with bits of cookies and cream. YUUMMMMM!!!!! 

When it comes to what you want in your cookies, I say "Throw in whatever the heck you like." Experiment a little! Personalize them to what you like. I happen to like lots of chocolate! You can put in dried cranberries, Oreos, or even some cayenne for a kick. 


You know how recipes say how long you are suppose to bake something for? I never follow those times. You know how you are suppose to preheat the oven before you actually put the cookies in? I never do that. I play by my own rules. That is how I rebelled as a teenager: not following recipes. Who's bad? I'm bad. 

How do I know when cookies are finished without over baking them? I keep a very close eye on them. My trick is when the very edges of the cookies start to become golden brown and look a tiny bit "wrinkly", I turn off the oven, pull the cookies out, and let them rest on the baking sheets even if the middle of the cookies look unfinished. Because the cookies and baking sheets are still hot once you pull the cookies out, the heat finish the baking process during the resting time. Then, you will have perfect cookies that are completely baked but with soft centers and slightly crunchy edges. 

BAM. There you have the secret to perfect cookies. 


Look at that chocolate just oozing out. Oh. My. Goodness. 

The reason why I love these cookies is that each cookie is different. One may have chunks of milk chocolate and white chocolate while another may have bits of cookies and cream. It adds the element of surprise when eating these cookies. 


If you try out this recipe, please tell me what you think of it! I would love to hear your opinions!

Lisa xx

Friday, July 19, 2013

The Veggie Major: Gardein Barbecue Wings Review

I thought it would be a nifty (mind my 50s language) idea to document what it is like being a vegetarian in college in a segment called The Veggie Major. Clever and fitting name huh? *High-five to myself!!* 

I have been a vegetarian for over three years now. A lot of my friends and family wondered how I would be able to stay a vegetarian in college because it is even difficult for an average non-vegetarian person to adjust to eating in college, attempting to avoid making the wrong food decisions and gaining the infamous "Freshman 15". I believe it is more difficult for vegetarians to make that adjustment because they would have to make sure they receive important every day nutrients like protein without eating meat. 

I kind of struggled a bit at the beginning of my freshman year. I was not taking in all of the nutrients that my body needed with the foods that I was eating from the dining commons. Now that I don't have to depend on dining commons, I can choose my daily menu and incorporate foods that will keep me healthy and provide me with the nutrients that I will need. 


Being a vegetarian, there are some foods that I miss, like BBQ!! I LOVE BBQ!! Smokey, tangy and sweet together in one dish?! Now that's what I'm talking about!! 

When I went to Target and saw that they have VEGAN barbecue "chicken" wings, I have to try it! Gardein Barbecue Wings are make of soy, what, organic grains and veggies. On the packaging, it states that both veggie and meat-lovers will like this product. One serving of 4 wings is only 120 calories, making it a great alternative to chicken if you are watching the amount of calories you intake. Also, a serving gives you 14 grams of protein which is fantastic for vegetarians who need to make sure they are getting their daily dose of protein without meat. The best part about it that I wish they would put somewhere on their packaging in larger words is that they use non-genetically engineered soy and wheat. That's huge!!!! Soy beans are one of the most genetically engineered crops, and for them to use non-GE soy is awesome!
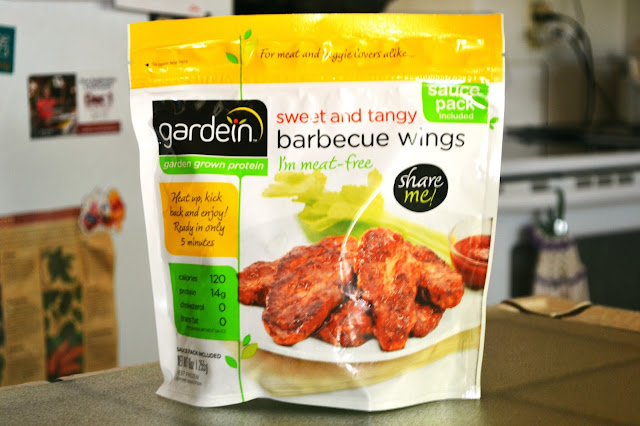


Though it says that it takes only 5 minutes to prepare, it actually took me double that time. It would probably take 5 minutes if you just threw everything together willy-nilly, but I wanted to make it taste good so I was okay with spending a little extra time! 


Though they don't say it on the packaging, another great cooking method would be grilling the wings, especially if you are going to be serving these at a party. The grill marks on the wings would make them look beautiful and would convince your guests that they actually are chicken. 
Who says you can mix art with food?! This coming from the girl who would always pretend she was Picasso and create pieces of art out of her leftovers.


They look like real BBQ chicken wings, but do they taste good and not like cardboard covered in BBQ sauce? 

Texture: These wings very much resemble the texture of real chicken. It is not like biting into a piece of soft tofu which many people think it would be like. The inside has that stringy, pull-apart type of texture that real chicken has. How do they make it like that? SCIENCE, BOYS AND GIRLS! 

Taste: It tastes like chicken! There is a slight difference, but it's not very noticeable when the wings are covered in sauce. The sauce, however, is just alright. It has a very slight smoky flavor, but I wish there was a bit more. It is not as tangy as I expected; therefore I had to have some ketchup on the side. It definitely leans more on the sweet side. I could have sworn I tasted tamarind in the sauce, but apparently there is none. 


Final verdict? It is a great product that is perfect for vegetarians like me who crave BBQ. I will definitely repurchase these. I've tried a couple of products from this line (primarily at The Yard House) and I keep on taking a double take to make sure they are vegetarian. It is incredible that they contain no meat whatsoever! 

Whether you are vegetarian or not, give this product and brand a chance! 

Lisa xx


Monday, May 20, 2013

BBQ "Chicken" Sandwich

Why "chicken"? When you put quotes around the name of a food, it usually has the connotation that it's not what it seems, like school cafeteria food (they claim it's beef when it's actually slime O_O). 

By "chicken", I mean meatless chicken made of soy protein. Bring on the gasps from the meat-lovers in the world! You may be thinking, "WHY IN THE WORLD WOULD YOU EAT FAKE CHICKEN?!?!?"

Well, to answer your question, I am a vegetarian. A proud one for 3 years, in fact! I made the decision to become a vegetarian as a challenge to see if I could do it, and it has sort of stuck with me ever since. But more on that story another time! 

So I eat meatless chicken, or chik'n as some vegetarians call it. Chik'n surprisingly tastes like chicken (it gets some of its chicken flavoring from non-meat ingredients) and has 64% less fat than real chicken. I think it's a great substitute for chicken, taste-wise. 

A few years ago, I discovered a brand called MorningStar Farms. They produce meatless products such as burger patties, sausages, bacon, meatballs, and, of course, chicken. I fell in love with the taste of their products because they tasted like meat, but had absolutely no meat in them!

Last week, I had a craving for some of their products, so I went to the grocery store next to campus and bought their Original Chik Patties, meatless chicken patties with a crispy breadcrumb breading. YUM!! 

For dinner on Monday night, I whipped up a BBQ "Chicken" sandwich with MorningStar's chik patties and a few other ingredients that I got from my dining commons. I'm the weird one in my hall that treats our dining commons like my own one stop grocery stop rather than a place to go eat at three times a day. I often get vegetables from their salad bar, bread from their bread cupboards, and anything else I need to bring back to my hall to make my own food ;D


Here is the recipe for a quick BBQ "Chicken" sandwich:


Ingredients
1 MorningStar Farms Original Chik Patty, frozen
2 tsp mayonnaise 
1/2 tsp sriracha
1/4 tsp lemon juice
1 slice provolone cheese
2 slices of wheat bread, lightly toasted
1 tbsp BBQ sauce
1 leaf of lettuce 

Instructions
1. Place the chik patty in the oven at 350 degrees F for 10 minutes.
2. While the patty is in the oven, mix together the mayonnaise, sriracha, and lemon juice. Put it in the fridge to chill until you are ready to use it on the sandwich.
3. After the 10 minutes are up, turn off the oven. Place the slice of provolone cheese onto the patty.Once the cheese has melted, take the chik patty out.
4. To assemble the sandwich, take the spicy mayonnaise mix out of the fridge and spread it onto one slice of bread. Place the lettuce onto the bread, followed by the patty. Spread the bbq sauce onto of the patty. Top it all off with the other slice of bread. Bon appetit!!


Yummy in my vegetarian tummy!! I can still taste the tangy bbq sauce, the creamy mayo with a kick, the crisp lettuce, and the crispy chik'n. Mmmmmmmm.........

If you have never tried meatless chicken before, this sandwich will be the best introduction to chik'n you will ever have!! 


I would love to hear your feedback on this recipe. Comment below telling me your thoughts about meatless food!

Lisa xx

Wednesday, May 15, 2013

My Beach Essentials

My Beach Essentials


Miu miu
net-a-porter.com


Havaianas gold shoes
$33 - superette.co.nz


Cynthia Rowley stacking bangle
cynthiarowley.com


Ray ban
bloomingdales.com


Laura Mercier sheer makeup
saksfifthavenue.com


Sheer makeup
neutrogena.com


Hawaiian tropic
$20 - nelly.com


Sea Shells Collection Set of 4
willowtreehome.com

College Life: My Dorm Room Desk


Around this time, high school seniors know where they are going to attend college, university, uni, or whatever you want to call it. Those seniors are being productive by figuring out what classes they are going to take throughout the next four years and how they are going to make a jump start on their careers....

But let's be honest.....

If they're like me, they are looking at dorm room decoration and organization ideas. I remember spending my nights looking at pictures of other people's dorm rooms, going through Bed, Bath & Beyond's website, making a list of what I wanted to bring, and planning out what I wanted to have on my walls and where to place them. 

Because of this, I thought it would be helpful to show those of you who are or will be entering college what my desk in my dorm room looks like. I'll give you some tips on how to organize and personalize your desk to make it a comfortable little area for you to get all of your work done at. 


In the right-hand corner of my desk, I have a desk organizer that I got as part of a set from Office Depot. I got it for my dad as a Christmas present, but he didn't use it, so I took it with me to college. Thanks Dad for not using the present I got for you. In this desk organizer, I have all of my colored pens, highlighters, pencils, pens, and LOTS of Post-It notes. I love Post-It notes. I use them EVERYWHERE! I also have my Clean & Clear Oil Absorbing Sheets, Nivea Lip Butter in Vanilla & Macadamia Nut, and Nivea A Kiss of Milk & Honey in a compartment of the organizer for easy access to some of my most used products.


My desk has a large cork board attached to it, and I use it to pin up reminders, random papers, etc. One section of my cork board is dedicated to memories I've made while in college. This area includes notes friends have written to me, a lanyard from Justin Bieber's concert, and a calming picture of an ocean horizon sunset. Whenever I'm feeling stressed out from school work, I like looking at this section because it always makes me instantly feel good from thinking about many happy college memories :) 


On the top section of my desk, I have a few of my books and a whole bunch of personal items. I have a box of Puff Tissues which I LOVE because of how pretty box is. I have it on my desk for easy access to tissues and also because it adds a colorful decorative element. Is that weird to do? On here, I have my Vitafusion Gummy Vitamins since gummy vitamins are the best vitamins to take because they taste like candy! I put my makeup brushes in a pen holder that I got at a 99 cents store for, you guessed it, 99 cents. To hold my hair brushes and combs, I use purple plastic plant pot that I bought at Ikea. On the far left side, you will see that I have a 3 layer organizer from Target. It is such a convenient thing to have because it has, within one layer, a multi-compartment unit that I use to put all of my hair ties, bobby pins, cotton pads, etc. I also put my medicine, mini first aid kit and mini sewing kit in here. 


Now let's take a look at what I have in the drawers of my desk!


Starting with the drawer that's located right where I sit, I have a whole bunch of office supplies in here to the point where I probably don't have to go to Office Depot for a good two years. To organize all of the things I have, I use a desk organizing tray that I bought at Target. I highly suggest you purchase a desk organizing tray like the one I have because they are extremely helpful with keeping your drawer nice and organized. 

Note: Though I have a graphic calculator, I can't really use it in class for exams because they're not allowed. Usually, professors do not allow you to use programmable calculators on exams to prevent you from cheating. Instead, bring a simple scientific calculator with you to college.


I got the idea of using the pages from my old magazines to line the bottom of my drawers somewhere on the Internet. Not only does it save money and recycles magazines I don't read anymore, but adds pops of colors, and I always find excuses to add pops of color anywhere! All I did was ripped out pages from an old Seventeen magazine, placed them on the bottom of the drawer, and tape them together. Easy!! 


The first drawer on the side of my desk has the makeup that I use the most at the moment and things for me to read/watch during my leisure time. Let's take a closer look, shall we?


The three containers came with the desk set I was talking about earlier. I separate my eye, face, and lip products among them. I also have a couple of palettes that I'm currently using in this drawer. (I will post another blog about what I'm currently using in the future.) 

Peeping out from underneath my Naked2 palette and Nars Laguna Bronzer, I have my Les Miserables book that I bought at the end of last year. I started reading it at the beginning of this year, but I became too busy and it's been in my drawer ever since. I'm determined to finish it before 2014 though! In this drawer, I also have a few DVDs, and can you guess what CD I have from looking at the picture?! Hint: look at one of the other pictures in this blog ;) 

As you can probably see, I own a box of earplugs. In college, especially when you are living in a dorm where the walls are thin, you will need earplugs!! There will be nights when all you want to do is sleep, but your dorm mates may be talking loudly or slamming their doors shut. A normal person might go and ask them to keep it down.....

.... However, because I can sometimes be a lazy college student, I prefer to save my energy, pop in some earplugs, and sleep soundly throughout the night ;D 


Moving onto the middle drawer, I keep blank sheets of both lined and printer paper, extra printer ink, flashcards, and two unopened packets of highlighters in here. Why do I have two packets of highlighters? Because I love highlighters and they were having a two for one sale. That's why. I'm a sucker for two for one deals! Even if I don't currently need it, I will often convince myself that I will need it in the future. 


Lastly, this drawer contains binders, folders, a clipboard, extra lined paper, sheet protectors, notebooks, and any other officer supplies that I could possibly need! I really made sure I was prepared for ANYTHING supplies-wise! There's nothing wrong with being prepared! Well, that's what I tell myself...


I hope you found this blog very helpful! I wish those of you who are planning for college the best of luck!!!


Lisa xx